Friday, June 3, 2022

best cupcakes alltime


Sprinkle cupcakes with pink vanilla buttercream

Confetti Sprinkle Cupcakes

  • Author: Sally
  •  
  • Prep Time: 25 minutes
  •  
  • Cook Time: 20 minutes
  •  
  • Total Time: 3 hours
  •  
  • Yield: 14 cupcakes

These soft and fluffy confetti cupcakes are above standard; taking everything you love about professional bakery cupcakes and converting them into a homemade recipe. For successful results, follow this recipe closely including using cake flour, only egg whites (no yolks), and sour cream. If desired, use chocolate frosting instead.


Ingredients

SCALE
  • 1 and 3/4 cups (207gcake flour (spoon & leveled)*
  • 3/4 teaspoon baking powder
  • 1/4 teaspoon baking soda
  • 1/4 teaspoon salt
  • 1/2 cup (115gunsalted butter, softened to room temperature
  • 1 cup (200ggranulated sugar
  • 3 large egg whites, at room temperature*
  • 2 teaspoons pure vanilla extract
  • 1/2 cup (120g) full-fat sour cream at room temperature*
  • 1/2 cup (120ml) whole milk at room temperature*
  • 1/2 cup (80grainbow sprinkles(plus extra for garnish)
  • vanilla buttercream or your choice of frosting

Instructions

  1. Preheat the oven to 350°F (177°C). Line a 12-cup muffin pan with cupcake liners. Line a second pan with 2 liners – this recipe makes about 14 cupcakes. Set aside.
  2. Whisk the cake flour, baking powder, baking soda, and salt together. Set aside.
  3. Using a handheld or stand mixer fitted with a paddle attachment, beat the butter and sugar together on high speed until smooth and creamy, about 2 minutes. Scrape down the sides and up the bottom of the bowl with a rubber spatula as needed. Add the egg whites and vanilla extract. Beat on medium-high speed until combined, then beat in the sour cream. Scrape down the sides and up the bottom of the bowl as needed. With the mixer on low speed, add the dry ingredients until just incorporated. With the mixer still running on low, slowly pour in the milk until combined. Do not over-mix. Gently and slowly whisk in the sprinkles. The batter will be slightly thick.
  4. Pour/spoon the batter into the liners. Fill only 2/3 full to avoid spilling over the sides. Bake for 19-22 minutes, or until a toothpick inserted in the center comes out clean. For around 30 mini cupcakes, bake for about 11-13 minutes, same oven temperature. Allow the cupcakes to cool completely before frosting.
  5. Frost cooled cupcakes with vanilla buttercream. I tinted it with 1 drop Dusty Rose Gel Food Coloring and used Ateco 849 piping tip. You can watch me decorate the cupcakes in the video above.
  6. Leftover cupcakes keep well covered tightly in the refrigerator for 3 days.

Notes

  1. Make Ahead & Freezing Instructions: Cupcakes can be made ahead 1 day in advance, covered, and stored at room temperature. Frosting can also be made 1 day in advance, covered, and stored in the refrigerator until ready to use. Freeze frosted or unfrosted cupcakes for up to 2-3 months. Thaw overnight in the refrigerator.
  2. Cake Flour: If you can’t get your hands on cake flour, you can make a cake flour substitute. I suggest doing this twice, mixing it all up in 1 bowl then removing 1/4 cup since you need 1 and 3/4 cups in this recipe.
  3. Egg Whites: Using all egg whites is KEY to their soft and fluffy texture. Here is the egg separator I use and love! Here are some recipe ideas for leftover egg yolks.
  4. Whole Milk & Sour Cream: Whole milk and sour cream are strongly recommended for the best taste and texture. A full fat plain yogurt would work instead, though the cupcakes may not be as light. Same goes with a lower fat milk.
  5. Sprinkles: Do not use nonpareils (the little balls) as they quickly bleed their color.
  6. Why is everything at room temperature? All refrigerated items should be at room temperature so the batter mixes together easily and evenly. Read here for more information.
  7. Confetti Cake: I suggest following my white cake recipe as the base, which is almost double this cupcake recipe. I also have a taller vanilla cake recipe as well. Fold 3/4 cup (120g) of rainbow sprinkles into either batter.
  8. Special Tools: KitchenAid Stand MixerEgg SeparatorCupcake PanCupcake LinersPink Gel Food ColoringPiping TipPiping Bags

Sunday, March 13, 2022

banana bread or muffins

 250 g flour

1 t baking soda

1/2 t salt

1/2 t cinnamon

1/2 c softened butter

150 g brown sugar

2 eggs

80 g yogurt/sour cream

4 large banana

1 t vanilla

3/4 c nuts

1 c chocolate chips


1. Cream butter and sugar

2. mix in 1 egg at a time

3. mix in yogurt, vanilla and banana

4. add dry


BREAD: 350 deg on low rack, 60-65 min

MUFFIN: 425 deg, 15 min. Reduce 350 deg, 16 min


To ripen baanana: 250deg, 15-20 min on sheet pan

Wednesday, January 26, 2022

creamy pesto pasta

 pasta

meat like chicken or whatever

1 can cream of something soup

1/2 c pesto sundried tomato or normal

1/2 c milk

sun dried tomatoes? artichoke hearts?


cook pasta

put everything in big pan situation

eat

Tuesday, January 18, 2022

no mixer vanilla cake

bon appetite


No-Mixer Vanilla Cake With Tangy Cream Cheese Frosting

Extremely plush, fine-crumbed, and dare-we-say moist, this is like the best wedding cake—and you mix it entirely by hand.

1.

A little advance planning: Your butter, cream cheese, and eggs must be at room temperature before you make the cake and the frosting. The butter and cream cheese should be soft enough that you can easily squish them with your fingers, but not so soft that they’re greasy or starting to melt. If you have a cool kitchen and plan to bake the cake in the evening, set them out on the counter in the morning; if you plan to bake the cake in the morning, set them out the night before. To speed up the process, cut them into tablespoon-size pieces. And if you need to bring your eggs to room temperature quickly, place them in a medium bowl (a quart container also works) when you go to heat your oven and fill the bowl with hot tap water. They should be good to go by the time you are ready for them.

2.

Place racks in upper and lower thirds of oven; preheat to 350°. Lightly coat two 9"-diameter cake pans with nonstick vegetable oil spray or butter generously. Line bottoms with parchment paper rounds and lightly coat with nonstick spray or butter. Whisk 2¾ cups (316 g) cake flour and 2¼ tsp. baking powder in another medium bowl.

3.

Cut ½ cup (1 stick) room-temperature unsalted butter into tablespoon-size pieces. Place 2¼ cups (450 g) granulated sugar in a large bowl. Heat ½ cup whole milk in a small saucepan over medium until just about to simmer, about 1 minute. (Or, heat in a microwave-safe bowl in a microwave in 30-second increments.) Pour over sugar and whisk vigorously until sugar is dissolved, about 1 minute. Immediately add butter and whisk vigorously until incorporated, about 1 minute. (Go for a full minute when whisking the sugar and the butter if in doubt.) Whisk in 1 Tbsp. vanilla bean paste or vanilla extract and 2 tsp. Diamond Crystal or 1 tsp. Morton kosher salt. Arrange a damp kitchen towel underneath bowl in a hollow ring to stabilize it, then gradually stream in ½ cup vegetable oil, whisking constantly until emulsified with no oily spots remaining.

4.

Add dry ingredients in 3 additions, whisking after each just until no dry spots remain before adding the next. Batter will be thick.

5.

Working one at a time, crack 5 large eggs into your hand or a mesh sieve set over a small bowl and let eggs whites collect in bowl; add yolks to batter one at a time, whisking until completely incorporated after each addition. (Save eggs whites for another use.) Add remaining 3 large eggs to batter one at a time, whisking until completely incorporated before adding the next. Whisk in ¾ cup sour cream; batter will be smooth and glossy.

6.

Divide batter between prepared pans. (If you’re a perfectionist, weigh your batter, divide by two, then measure that amount into each pan—you’ll likely want about 750 g in each.)

7.

Bake cakes, rotating pans top to bottom halfway through, until golden and a tester inserted into the center comes out clean, 40–50 minutes. Transfer pans to parchment-lined wire racks and let cakes cool in pans 10 minutes. Turn out cakes onto racks, peel away parchment paper rounds, and turn right side up. Let cool completely. (The parchment on the racks will prevent the moist cake from sinking into the racks.)  CUPCAKES: Start checking them around 12 or 13 minutes—I don't think they'd need more than 15–17 in a 350° oven.

8.

Wrap cooled cakes tightly in plastic and chill in the fridge at least 1 hour or in the freezer at least 20 minutes (this will make them easier to frost because the frosting won't pick up as many crumbs).

9.

Meanwhile, make the frosting. Using a rubber spatula, smash together two 8-oz. packages room-temperature cream cheese and remaining ½ cup (1 stick) room-temperature unsalted butter in a clean large bowl until homogenous, smooth, and fluffy (don’t be afraid to be aggressive). Stir in ¾ tsp. Diamond Crystal or ½ tsp. Morton kosher salt, remaining 2 Tbsp. sour cream, and remaining 1 tsp. vanilla bean paste or vanilla extract. Using a fine-mesh sieve, sift in 1½ cups (165 g) powdered sugar. (It is important to sift here, otherwise, you’ll end up with clumps.) Stir until smooth, then taste and add more sour cream or salt if needed. (You should have about 3 cups frosting.)

10.

If you want to make a fruity filling, scoop about 1 cup frosting into a small bowl. Sift in 2 Tbsp. (10 g) freeze-dried raspberry or strawberry powder and stir until no lumps remain.

11.

To frost the cakes: Place 4 long strips of parchment paper along edges of plate to make a large, hollow square, then place a cake layer on top. You’ll be able to shimmy these out from under the cake, leaving a clean, frosting-free plate behind. Scoop fruit frosting (or about 1 cup plain frosting) on top of cake and spread into an even layer with rubber spatula. Place second cake layer over. Scoop another 1 cup frosting on top and spread evenly over cake surface. Frost sides of cake, as well as top as needed, with remaining frosting. You can use a thin butter knife to fill in any gaps or bare spots. Run knife along the top of the cake to create a subtle ridge pattern or swirls as desired. Remove parchment strips.

→ Domed layers? No spatula? Get our stacking and decorating tips here.

12.

This cake has the best texture at room temperature—tent it with foil or plastic and leave on the counter 1–2 hours before serving. It will also tastes great straight from the fridge if you make it ahead.

Do ahead: Cakes can be baked 2 days ahead; keep chilled, or freeze, up to 2 weeks. If frozen, let thaw overnight in the fridge. Frosting can be made 5 days ahead; cover and chill. Bring to room temperature, then whisk or stir with a rubber spatula to lighten before using. Cake can be assembled 5 days ahead; wrap and chill.

pickled red onion

 1 c white vinegar

1 cup water

1/6 c sugar (37 g)

1 T salt

Sunday, September 26, 2021

Snapper oven


A lacquer tray containing a whole Japanese Baked Sea Bream.
4.67 from 6 votes

Japanese Baked Sea Bream

Seasoned with salt and baked till crisp on the skin and juicy inside, this Japanese Baked Sea Bream is often served on celebratory occasions, including Oshogatsu (Japanese New Year). The whole fish will make a stunning centerpiece of your feast. I'll show you how to cook it perfectly every time!
Prep Time15 mins
Cook Time45 mins
Rest Time30 mins
Total Time1 hr 30 mins
Course: Main Course
Cuisine: Japanese
Keyword: fish
 
Servings: 4
 
Calories: 225kcal
 
Author: Namiko Chen

Ingredients

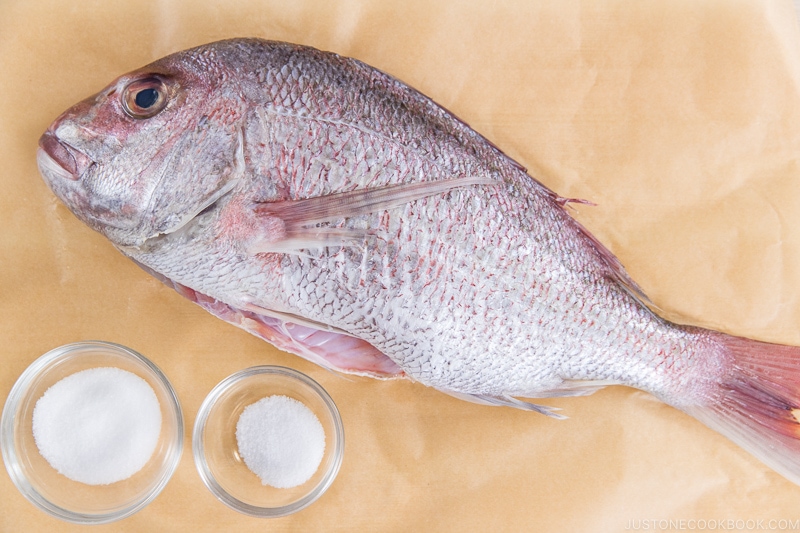
  • 1 red sea bream (madai çœŸé¯›; this is a 3-lb, 17-inch-long fish; after gutted, 2.8 lb)
  • 1 ½ tsp kosher/sea salt (I use Diamond Crystal; use half for table salt) (You’ll need ½ tsp salt per pound)
  • 2 Tbsp kosher/sea salt (I use Diamond Crystal; use half for table salt) (for sprinkling fins and tail)

Instructions

  • Gather all the ingredients.
    Japanese Baked Sea Bream Ingredients

To Prepare the Fish

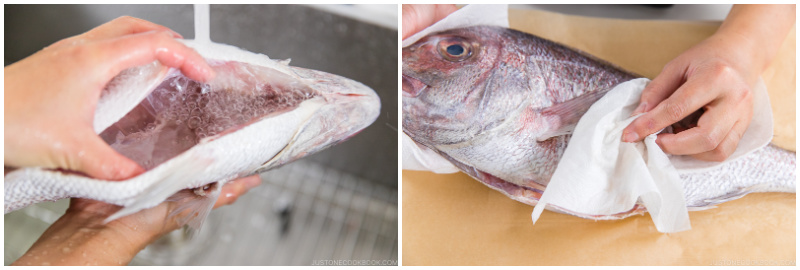
  • Rinse the fish, both inside and outside, under cold water. Pat dry with paper towels.
    Japanese Baked Sea Bream 1
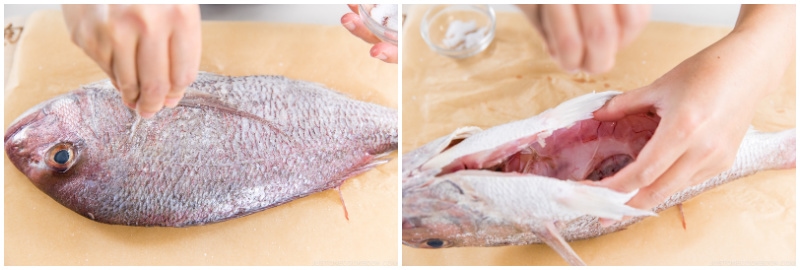
  • Sprinkle salt all over the fish and inside the fish. Why salting? Please read the blog post on why salting is important. Let stand for 30 minutes on the kitchen counter.
    Japanese Baked Sea Bream 2
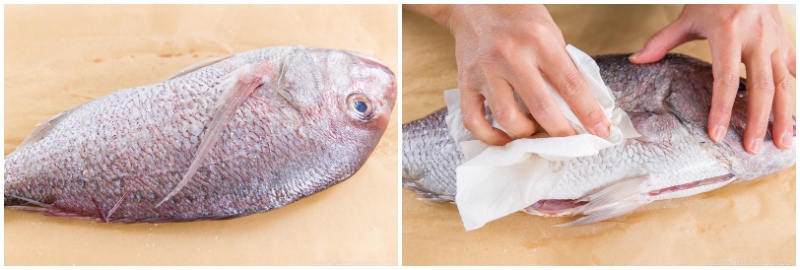
  • After 30 minutes, preheat the oven to 425ºF (220ºC). For a convection oven, reduce cooking temperature by 25ºF (15ºC). Pat dry all the moisture oozed out from the fish with paper towels.
    Japanese Baked Sea Bream 3
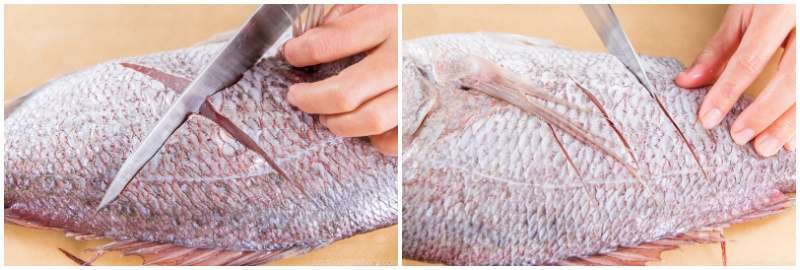
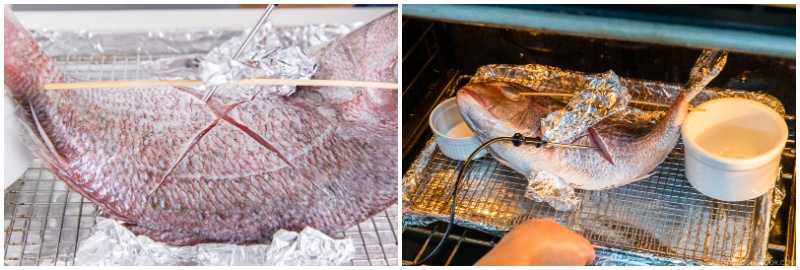
  • Score the thickest part of the flesh. Score an X on the front (fish head pointing left). Make 2-3 slashes on the back (fish head pointing right). The depth of slashes is usually midway between the skin and the bone, just enough to opening up the flesh for the heat to get through the flesh more efficiently. Read more about it in the blog post.
    Japanese Baked Sea Bream 4
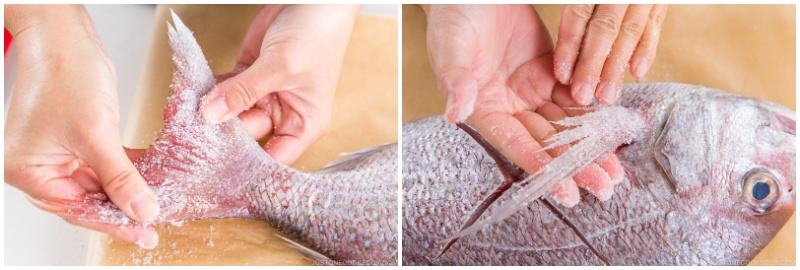
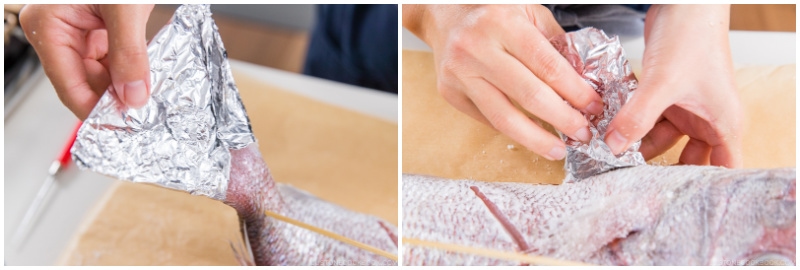
  • Coat the fins (3 locations) and tail with salt to prevent them from burning. Spread them when sprinkling salt and press down with fingers.
    Japanese Baked Sea Bream 8
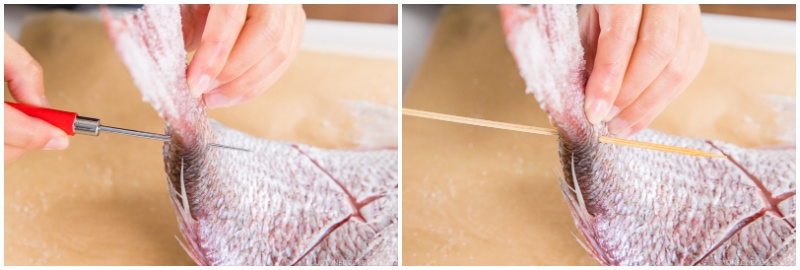
  • Find a pointy object like an ice pick (I use a takoyaki pick), make a puncture near the tail so a bamboo skewer can go through (Unfortunately, a bamboo skewer is not strong enough to puncture through the fish).
    Japanese Baked Sea Bream 9
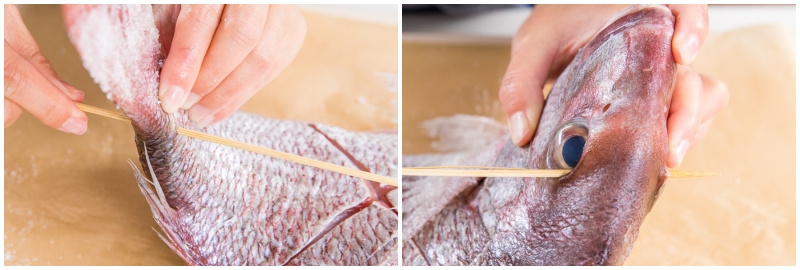
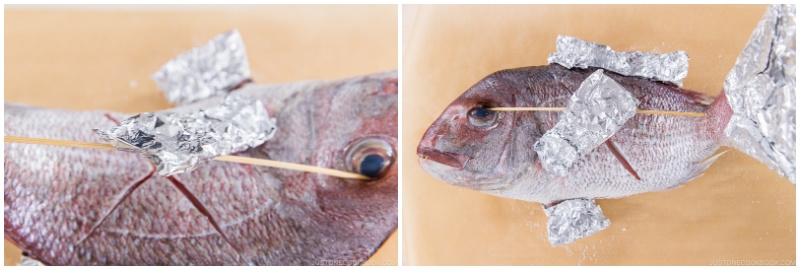
  • Insert the bamboo skewer through the hole in the tail then puncture through the upper eyes.
    Japanese Baked Sea Bream 10
  • Cover the tail and fins with aluminum foil.
    Japanese Baked Sea Bream 12
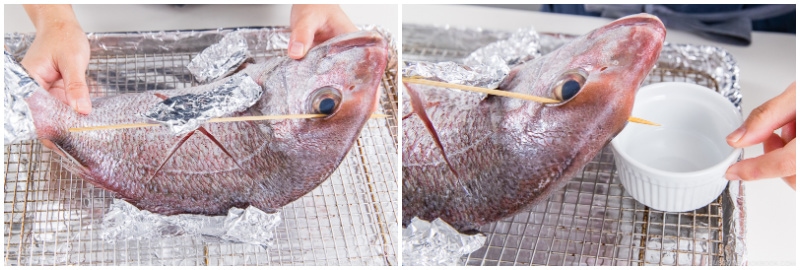
  • Put the foil-wrapped pectoral fin on the bamboo so that it will stand up after being baked.
    Japanese Baked Sea Bream 13
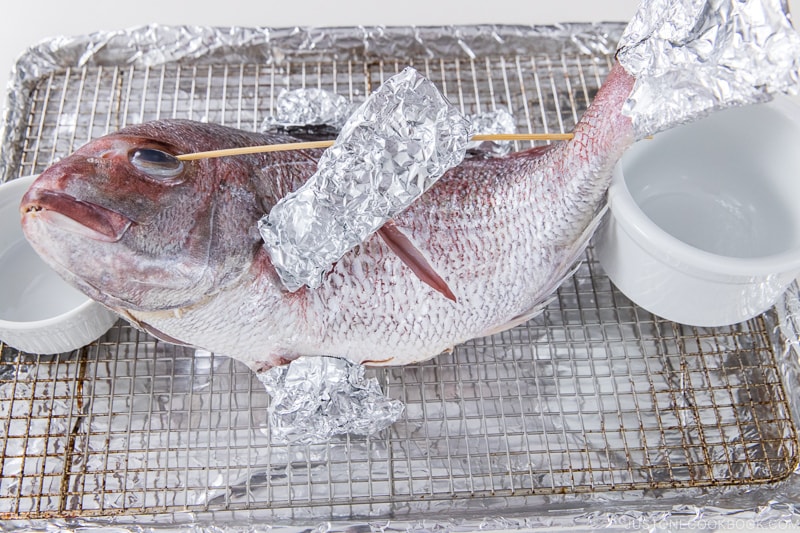
  • Place the fish on the wire rack (so the air would go through underneath the fish). Put the oven-safe ramekins to support the head and tail.
    Japanese Baked Sea Bream 14
  • Here’s the closer look.
    Japanese Baked Sea Bream 15

To Bake

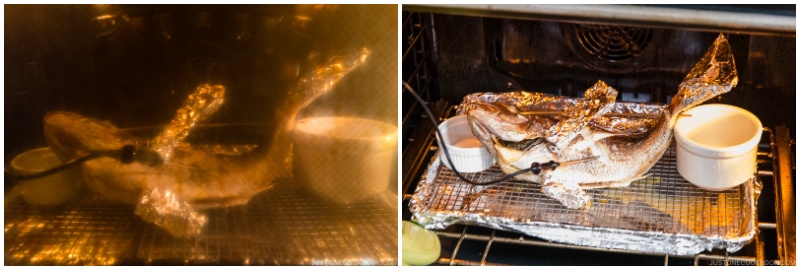
  • Insert the oven probe into the thickest part of the flesh (through the score). Transfer the baking sheet to the oven and attach the probe to the oven.
    Japanese Baked Sea Bream 15 2
  • Bake the fish at 425ºF (220ºC) until the thickest part of the fish registers 145°F (63°C) on the oven meat probe or on an instant-read thermometer, about 40-45 minutes (for a 3-lb fish).
    Japanese Baked Sea Bream 16
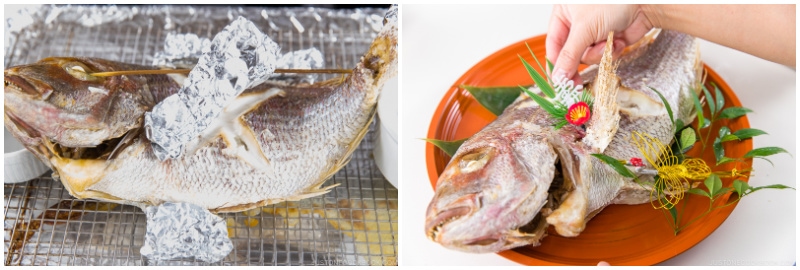
  • Remove from the oven. Take out the skewer and the aluminum foil (be careful as the fins and tail may be stuck to the foil). Decorate the fish (read the blog post for some ideas) and serve immediately.
    Japanese Baked Sea Bream 17

To Store

  • You can store the leftover in an airtight container in the refrigerator for up to 3 days.

To Use Leftover Fish (Bone and Flesh)

  • Make Tai Meshi (Sea Bream Rice) following my recipe.

Notes

Recipe by Namiko Chen of Just One Cookbook. All images and content on this site are copyright protected. Please do not use my images without my permission. If you’d like to share this 

Tuesday, February 9, 2021

Tuscan Onion soup


  • 2 pounds (roughly 1 kg) red onions, sliced thinly
  • 2 tablespoons extra virgin olive oil, plus more for drizzling
  • 4 fresh sage leaves
  • salt and pepper
  • 4 cups (1 liter) vegetable stock
  • 4 eggs (can omit or put italian sausage instead)
  • 3/4 cup grated Parmesan cheese, plus more for serving if desired
  • 4 slices crusty bread, toasted
  • 1.In a large, heavy-bottomed stock pot, gently saute the onion in the olive oil with a good pinch of salt and pepper and sage leaves on lowest heat. Let them sweat very gently without letting them colour to release their sweetness, about 30 minutes. If they begin to get dry or stick just add a splash of the vegetable stock
2. Add the stock to cover and turn heat up until it begins to simmer. Keep heat on medium and let the soup cook 30 minutes. Check for seasoning and add salt or pepper as needed.

3. About 5 minutes before soup is ready, sprinkle half of the cheese over the top of the soup, crack the eggs into the pot and cover with the rest of the cheese and cover, without stirring. The whites should be cooked and the yolks runny—about 5 minutes.

4. Serve the soup with an egg in each bowl along with the bread. If desired, sprinkle over extra Parmesan, a grating of black pepper and a drizzle of olive oil.